
I was asked by a number of ladies on my forum whether I would be willing to do a tutorial on how to use alcohol inks and get different effects with them. I am not sure that I am the best person to do this as there are many good tutorials on-line and I am only a novice with them, but I am happy to share my experiences so far. I have tried three main methods so far and wll try and describe them with photos below.
 Materials needed: Glossy ppaer, alcohol inks (a range of colours), alcohol blending solution, mixatives (I have gold and silver), applicator and felt pads.
 Method 1. Dropping inks onto glossy paper.
In this example I used butterscotch and terracotta inks, the blending solution and gold mixative.
 First drop butterscotch ink directly onto the glossy paper in a random pattern
 Then drop terracotta ink around on the same area of paper
 Then add the blending solution -I tend to use quite a lot and then swoosh the paper around so that it covers the whole area. At this point the pattern could be used as a background once dry.
  In this case I experimented further and added spots of gold mixative followed by more blending solution
 To create the final effect I used a bit of cotton wool and swished the gold around to generate a swirly gold background. This has given quite an autumnal and oriental feel to the paper.
Method 2: Using the applicator to generate patterned backgrounds
In this case I used three different colours (bottle, meadow and butterscotch), the applicator and a felt and the blending solution.
Example A: This used small amounts of the inks dropped in a random pattern over the felt.

 When applied to the glossy paper there were gaps in the pattern where the white showed through.
 I then added the blending solution to the same felt pad
 Then when applying this back over the pattern I didn't just stamp the pattern, I smeared it across over the top of the original pattern to generate this as a final pattern.
Example B: This used larger quantities of ink dropped in a random pattern over the felt.

 Although on the felt there were gaps between the ink spots there was so much ink in these spots that when they were stamped onto glossy paper no white showed through.
 I then dropped the blender directly onto the glossy paper to generate the final pattern. An alternative is to add several drops of blender onto the felt pad and then restamp over the paper with that. Beware though, the blender dilutes the ink colours for a more muted tone.
Method 3. To generate a background for a landscape stamp
There are several different methods to do this, with the main one to drop your inks directly onto the glossy paper where you think your stamped image will end up trying to get the right colours for the sky, trees, grass, water etc. However, this isn't always easy and so for the stamped image I used for my father-in-laws birthday card I used the applicator.


Firstly onto the applicator I put drops of denim and stream where I knew the water was going to be and then added meadow and bottle for the grass around. I used large drops so that the inks all ran into each other as shown above.


Then for the grass on either side I used a fresh applicator with drops of bottle and meadow to continue the grass effect.


For the sky I used butterscotch and plum with a little terracotta and then when applying to the glossy paper I overlapped very slightly with the grass and the stream bits and smeared the pad sideways to give a sunset type of effect.
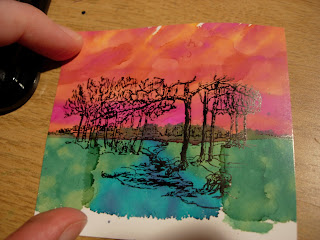
Finally I used black StazOn ink to ink up the landscape stamp from StampsAway and then stamped it into the relevant parts of the background to generate this final image ready for trimming and mounting onto a card.
I hope that you find this mini tutorial helpful, it is the first one I have done so please leave a comment to let me know what you think.
Love,
Caro
x
2 comments:
thanks! brilliant tutorial!
very clear and exactly what I need as I am new to alcohol inks. another thing I want to try is the inks used on acetate as overlays on atcs.
Well done Caro, several ways demo-ed there and I love that last one.
xxxxxx
Post a Comment